How To Create Viral Factory Video – Master Prompt
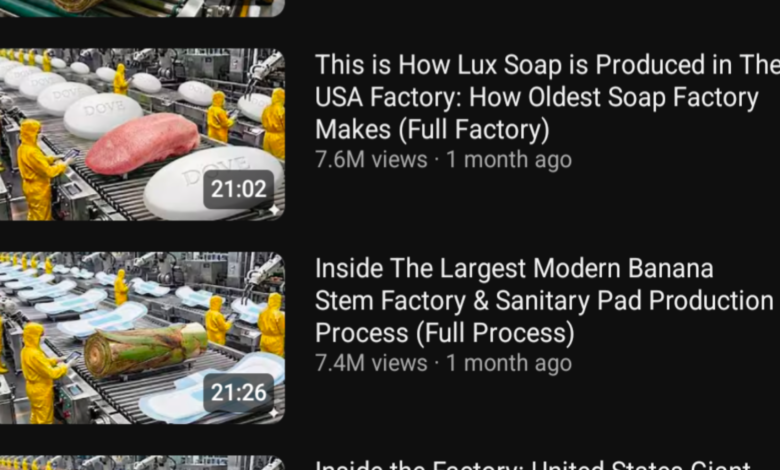
If you’re creating industrial documentary-style YouTube videos, having the right prompt can completely transform the quality of your content. Whether you’re generating video titles, scene-by-scene visual prompts, or cinematic thumbnails, this powerful AI prompt helps you produce content similar to high-budget factory documentaries.
This guide introduces a complete prompt framework that can generate:
- Industrial documentary-style YouTube titles
- Scene-by-scene image prompts for video production
- Cinematic thumbnails with high-detail factory environments
This prompt is perfect for creators producing content about:



- Factory processes
- Industrial manufacturing
- Billion-dollar industries
- Raw materials transformed into luxury goods
- Behind-the-scenes production systems
How This Prompt Works
This AI prompt system consists of three parts:
- Industrial Documentary YouTube Titles – Generates curiosity-driven titles with hooks like “Million-Dollar Products” or “Billion-Dollar Industry Secrets.”
- Scene-by-Scene Image Prompts – Creates ultra-realistic industrial visuals for each step of the process.
- Cinematic Thumbnails – Produces professional, attention-grabbing YouTube thumbnails.
The prompts are designed to maintain a documentary-style, educational, professional, and curiosity-driven tone
Example Titles
Here are some titles you can generate with this prompt:
- Inside the Snake-Leather Factory: From Snake Skin to Luxury Jacket (Full Process)
- Inside the Leopard-Leather Factory – Million-Dollar Products Are Made from Leopard Skin (Full Process)
- How Coca-Cola Is Made Today: Inside the Modern Factory & Billion-Dollar Industry Secrets
- Inside the Cow-Leather Factory – How Million-Dollar Products Are Made from Cow Skin (Full Process)
- Inside the Cigarette Factory: How It’s Made & the Billion-Dollar Industry
These titles are perfect for attracting viewers while highlighting hidden industry secrets and transformation processes.
Tools You’ll Need
- ChatGPT
- Image generator
- Capcut
How to Use This Prompt
Step one
Industrial Documentary Title Generator Prompt
TOPIC PROMPT
Give me [X] industrial-themed YouTube video title ideas in the style of inside-the-factory, industrial process, and billion-dollar industry documentaries.
Follow these rules exactly:
1. Title Format
Each title must use a two-part structure:
Part 1 must start with “Inside the…” or “How… Is Made Today:”
Part 2 must describe the transformation, process, or hidden industry mechanism
2. Required Hooks
Every title must include one of the following:
“Million-Dollar Products”
“Billion-Dollar Industry Secrets”
“From ___ to Luxury ___”
“How It’s Made”
“Full Process”
3. Content Focus
Emphasize industrial transformation or hidden industry secrets, such as:
Raw materials → luxury products
Factory processes → high-value items
Ordinary goods → billion-dollar industries
4. Title Casing
Use proper title case: capitalize major words and avoid ALL-CAPS.
5. Tone
Maintain a documentary-style, educational, industrial, professional, and curiosity-driven tone.
6. Structure Style
Titles should follow clean patterns like:
“Inside the ___ Factory: From ___ to ___ (Full Process)”
“Inside the ___ Factory – How Million-Dollar ___ Are Made from ___”
“How ___ Is Made Today: Inside the Modern ___ & Billion-Dollar Industry Secrets”
Example Titles
Inside the Snake-Leather Factory: From Snake Skin to Luxury Jacket (Full Process)
Inside the Leopard-Leather Factory – Million-Dollar Products Are Made from Leopard Skin (Full Process)
How Coca-Cola Is Made Today: Inside the Modern Factory & Billion-Dollar Industry Secrets
Inside the Cow-Leather Factory – How Million-Dollar Products Are Made from Cow Skin (Full Process)
Inside the Cigarette Factory: How It’s Made & the Billion-Dollar Industry
Inside the Crocodile-Leather Factory: From Farm to Luxury Item (Full Process)
Step two
Industrial Process Scene-by-Scene Image Prompt
Create (x) scene-by-scene image-prompt breakdowns that visualize the complete industrial process of topic number (x).Every scene must depict a modern, efficient, high-tech industrial environment.
Required Components for Every Scene
1. Factory Setting
Specify the exact location: assembly line, processing hall, treatment room, warehouse, laboratory, packaging area, etc.
Highlight realistic industrial lighting such as LED ceiling panels, diffused overhead illumination, reflective metallic highlights.
2. Materials / Elements in the Scene
Identify all raw materials, components, chemicals, or animals present.
Describe textures, colors, and spatial arrangement of materials.
3. Industrial Action
Clearly explain the specific industrial task occurring in the scene.
Include relevant machinery and tools: conveyor belts, robotic arms, hydraulic presses, cutting systems, tanks, mixers, extruders, etc.
Show workers executing precise, synchronized tasks while using proper safety equipment.
4. Atmosphere
Add dynamic environmental elements: steam bursts, dust particles, liquid flow, sparks, reflections, rotating gears, moving belts, and other realistic motion effects.
Emphasize cleanliness, organization, and smooth production flow.
5. Cinematic View
Choose a strong camera angle: overhead shot, wide shot, macro close-up, crane view, dolly shot, POV, etc.
Ensure the scene feels like a high-budget educational industrial documentary.
End each scene with this tag:
“ultra-realistic, cinematic, professional, high-detail 4K, documentary style”
Scene Structure Templates
If the topic involves animals, create scenes in this order:
Arrival & inspection
Harvesting & separation
Cleaning & treatment
Drying / tanning / curing
Cutting & shaping
Assembly & finishing
Quality check
Packaging & distribution
If the topic does not involve animals, use this sequence:
Raw material arrival
Sorting & initial processing
Main manufacturing
Secondary processing
Assembly line
Packaging
Storage & distribution
After chatgpt give you list of titles now choose the number of the title that you want then copy this another prompt and replace [X] with number of title that which chatgpt give it to you, after replacing post it to chatgpt
Step Three
Industrial Process Scene Structure
After you give ChatGPT this prompt, it will generate a number of image prompts based on the number you entered.
From there, you can start copying the image prompts one by one and go to an image generator such as Grok or ImageFX, then paste the prompt there to generate the image you need.
After you finish generating the images, take the images one by one and go to an image-to-video tool. Upload them there and add each of their video prompts. This is how you will convert the images into videos.
After you finish turning them into videos, open CapCut or any other video editing application and edit the video.
Step Four
Cinematic Industrial Thumbnail Prompt
Thumbnails play a huge role in YouTube click-through rates. This prompt generates high-quality cinematic industrial thumbnails, use this prompt blow to create a professional thumbnail, just copy the prompt and give it to ChatGPT
Final Tips for Better Results
- Use proper title casing for all YouTube titles.
- Include hooks like “Million-Dollar Products” or “Billion-Dollar Industry Secrets.”
- Ensure scene-by-scene images have consistent industrial lighting and perspective.
- Keep thumbnails high-detail, cinematic, and symmetrical.
- Experiment with variations to see which titles and visuals drive the most engagement.
Generate a highly detailed thumbnail-style image prompt in a surreal industrial-factory aesthetic, inspired by the topic I selected.
Required Style & Visual Direction
Overall Look
Ultra-realistic industrial factory environment
Wide-angle shot viewed from a slightly elevated camera position
Bright white LED lighting illuminating the entire workspace
Surreal impression layered onto an otherwise documentary-realistic setting
Factory Elements
Stainless-steel conveyor belts, spotless and reflective
Workers in bold yellow or red protective uniforms, complete with hats or safety gear
High-detail raw materials positioned prominently at the center of the composition
Long rows of hanging materials or repeating products extending into the background
A large warehouse interior with tall ceilings, emphasizing scale and symmetry
Cinematic Qualities
Sharp, crisp detailing with professional manufacturing-environment accuracy
Balanced, symmetrical composition for strong visual impact
Cinematic 4K photographic quality
No text anywhere in the scene